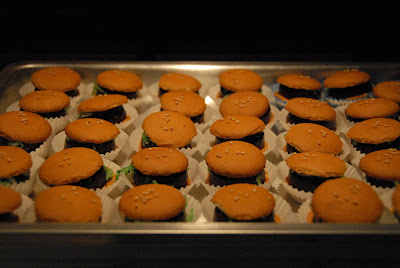
I volunteered to bring dessert for the kids' end-of-the-year performance and party at school. I wanted to do something fun that would really appeal to kiddos, and my mom had great suggestions for two desserts from my childhood: burger bites and domino brownies. Fun and easy!
First up, the burger bites. I'm sure you've seen these, and they were SUCH a big hit - totally disproportionate to the amount of work (or actual baking: none) that does into them. I used 'Nilla Wafers, mini Peppermint Patties, coconut tinted green with a little food coloring, and sesame seeds. With one box of cookies and one bag of candy, I was able to make about 40 burgers.
Preheat the oven to 250F. Place half the cookies, rounded side down, on a cookie sheet; that's the bottom bun. (Do I have to say you should unwrap the Peppermint Patties? Do it now.) Place one patty on each cookie; that's the burger. Before you put them in the oven, you're going to want to get the coconut (lettuce) and remaining cookies ready. I'm not much for mise en place, but you have to move fast once they are heated so the top "bun" will stick. Measure about 1/2 cup coconut and place it in a tupperware with a couple of drops of green food coloring, then seal it and shake it around to evenly coat the coconut.
Place the tray in the oven for just a minute or two, until the Peppermint Patties are a tiny bit shiny/melty on the top, but not melting. Pull the pan from the oven and quickly sprinkle it with a little coconut and top it with the other cookie, round side up. You need to do this fast so the buns will stick. Once you've finished all of them, brush each cookie lightly with water and sprinkle four or five sesame seeds on top. This isn't an exact science; just do what looks good to you. I placed each cookie in a small cupcake liner to keep them upright and from melting together.


Now for the domino brownies. These couldn't be easier! I just made my standard brownie recipe (which I recently discovered can be found on Epicurious - guess it's not a family secret, though I think my mom and I both consider it our "go to" recipe) and doubled it so it made a 9x13" pan. The cooled brownies were frosted with my standard bakery buttercream icing.
Bakery Icing
1 1/2 cups (3 sticks) unsalted butter
1/2 cup shortening
6-8 cups powdered sugar
1 3/4 teaspoons vanilla extract
1/4 teaspoon almond extract
3-5 ounces of milk or cream
Beat together butter, shortening, powdered sugar, vanilla extract, and almond extract; add a little milk or cream when it starts to get dry. Beat on high for a few minutes until all lumps are gone and the color lightens a little. The amounts of sugar and milk can vary depending on how light you like your frosting; I usually use 6 1/2 or 7 cups of sugar and about 4-5 tablespoons of milk. I like it light and easily spreadable. By the way, this much frosting will cover and fill a two-layer cake; you could safely halve it for the brownies and still have plenty.)
Back to the method. Frost the brownies, then cut them in domino-sized rectangles. I think I got about 48 (8x6). Remove them from the pan and separate them slightly to make it easier to decorate them. I used a fairly narrow chopstick to draw a line across the brownie to form the two halves of the domino. Mini-chocolate chips, point sides down, form the dots. This is actually very time consuming and rather a pain, but not difficult. I tried to make a good assortment of dot combinations so it would resemble a real domino set. I also had to cheat and look at actual dominoes to remember the position of the dots! They came out super cute and, of course, delicious. Now for the confession: I am a big dork. I made the brownies earlier in the week and froze them. In my not-so-infinite wisdom, I cut them first. Um, yeah. Thursday night, I frosted them. It's awfully hard to see where the brownies are cut with frosting on the top. I gently pulled them apart, but of course the frosting wasn't as neat as if I had just cut straight through them, so I used a small offset spatula to go around the edges and smooth them. They worked fine (and 3-5 year olds aren't that discerning), but it did add some extra work. They're still cute, though!


Comments
buy viagra